Many people want to know how to back up an iPhone to an external drive, including you. Why? When you back up your iPhone, you are protecting yourself in the event that you lose your iPhone or if it gets damaged at some point. Apple’s own iCloud backup service is indeed excellent. For those who do not find this attractive or are running out of iCloud storage space, learning how to backup an iPhone to an external hard drive would be beneficial.
An external hard drive with sufficient storage capacity will be required for this task. Therefore, consider investing in one of the top external hard drive models before you begin backing up your iPhone data.
- The Very First Step: How to Find Your Current Backup on MacOS?
- How Can You Backup an iPhone to an External Drive on Windows?
- How Can You Backup Your iPhone to an External Hard Drive on a Mac?
- How can I tell whether my backup was successful?
- How Can You Make Your Backup Location Change Even More Convenient?
- Wrapping Up
The Very First Step: How to Find Your Current Backup on MacOS?
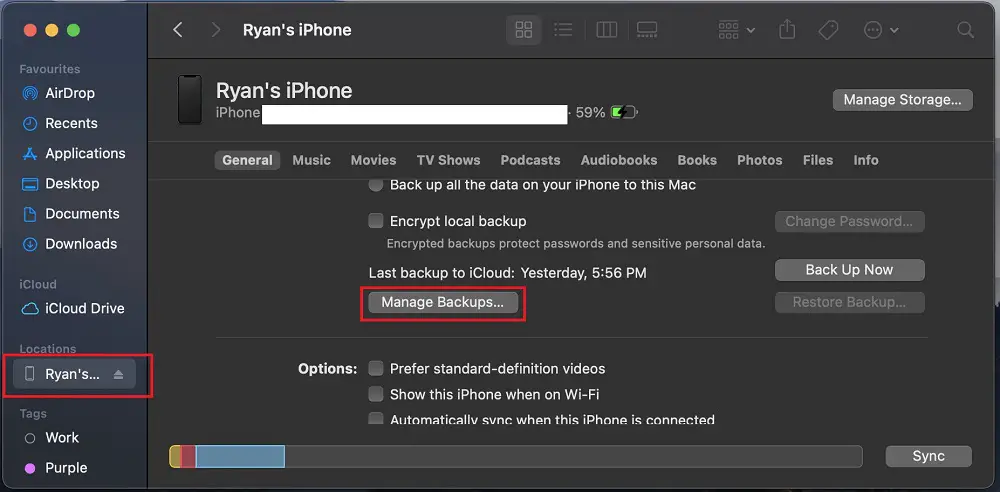
It’s necessary to know where your iPhone backup is stored on your Mac before you can transfer it to an external hard drive. Finding it isn’t a problem at all, and here’s how to do it:
1. In the Dock of the Mac, click Finder.
2. Under “Locations,” find your iPhone and select it.

3. Click on “Manage Backups.”
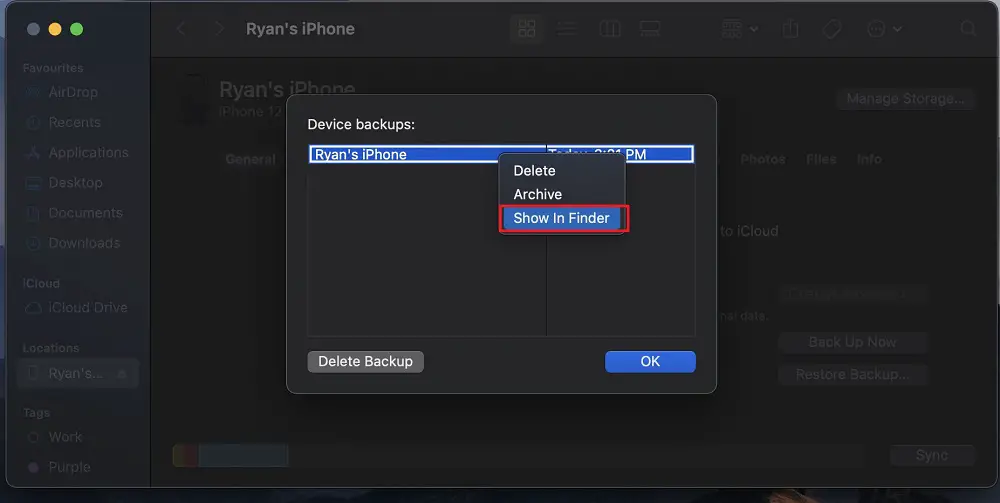
4. While holding down the control key, click the backup name you want.

5. Now click on “Show in Finder.”
You’ve found the backup with no problems.
How Can You Backup an iPhone to an External Drive on Windows?
When it comes to backing up your iPhone, several third-party applications make it simple to transfer backups to an external hard drive. However, a little-known Windows command allows you to use iTunes to back up your phone straight to your USB hard drive. Here’s how to do it:
- If iTunes is currently running on your computer, it should be closed.
- Connect your external USB hard drive to the computer where you wish to save and backup videos from the iPhone. Let Windows detect and set up the device for usage while waiting a few seconds. Close the AutoPlay window if it comes or if Windows asks you what you want to do with the drive.
- To launch File Explorer, use the Windows key + E. Click on “Computer” and make a note of the drive letter that Windows has allocated to the external hard drive.
- Connect the iPhone’s data sync cord to a second USB port on the PC. If iTunes launches on your computer, close it.
- Use the Windows key + R. Enter “cmd” into the Run box and hit the “Enter” key to launch a Run box. The “Yes” button should be selected if a User Account Control window appears after hitting Enter. A Command Prompt window opens.
- At the command prompt, type the following command and hit the “Enter” key to execute it:
mklink /J “C:\Users\yourWindowsusername\AppData\Roaming\Apple Computer\MobileSync\Backup” “f:\iPhoneBackup”
- Modify the value of the “yourWindowsusername” variable to reflect the real username associated with your Windows account. Modify the letter “f” in “f:iPhoneBackup” to correspond to the drive letter given to the external storage device by Windows. Change the value of the “iPhoneBackup” variable to the folder’s name on your external hard drive where you wish to keep the backup.
- Wait a few seconds for the iPhone to be recognized by iTunes once it is launched on your computer. In the Devices list, click on the iPhone.
- On the menu bar, click “File.” Make sure you select “Devices,” then “Back Up.” Enable the “This computer” option on the “Summary” tab and then click “Back Up Now.” Wait a few seconds for iTunes to complete a standard backup of the iPhone.
- To open File Explorer if it has been closed, hit “Windows-E.” Double-click the drive letter of the external hard drive after tapping “Computer.” To view the backup file from iTunes, go to the folder where it was saved on your hard drive.
How Can You Backup Your iPhone to an External Hard Drive on a Mac?
For Mac users, the process of backing up an iPhone to an external hard drive is essentially the same whether they are using macOS Mojave or previous operating systems that utilized iTunes for iPhone backups. If you are using a Mac with macOS Catalina, the procedure is somewhat different since you will be utilizing the Finder instead. Here’s the process:
- If you’re using macOS Mojave or an earlier version of the operating system, connect your iPhone and launch iTunes. In the upper left-hand corner, choose the iPhone device icon. If your Mac is running macOS, open the Finder from the app dock at the bottom of your screen.
- In the “manually backup and restore” section of your device information menu, click “back up now.” The “back up now” option for Catalina users may be found in the “backups” section.
- This procedure will take some time to complete, especially if this is the first time your device has been backed up. You may then transfer your data to an external disk after it has been completed.
- You may backup your iPhone files to a specific location in iTunes or Finder. The location is “/Library/Application Support/MobileSync,” which will not display in the Finder. Type your backup folder location into the search bar at the upper right of your Mac screen. Search for and right-click on the most recent backup folder to create a copy option.
- Paste your backup folder into the “locations” menu item on your external drive in the Finder’s left-hand menu.
You’ll need to do this every time you conduct a manual backup of your iPhone to your Mac, just as you would with Windows.
How can I tell whether my backup was successful?
Following the backup of your iPhone to a portable hard drive, you should perform the following test to ensure that iTunes is indeed backing up from the new location:
- Connect your iPhone or iPad to the computer.
- Launch iTunes or use the Finder to find your device.
- Select “Back Up Now.“
- Once the backup has been finished, go to the iOS backup folder on the external drive and open it.
It is important to double-check that the previous backup was made at a time that corresponds to the current activity.
Before you can get rid of your old backups, you need to ensure the test is going well.
How Can You Make Your Backup Location Change Even More Convenient?
If you don’t always have the external hard drive plugged in, having a backup on the external hard drive might cause problems. If you don’t want to back up your iPhone automatically, this is how to do it.
- Click Finder.
- Under Locations, locate your iPhone and click on it.
- To disable automatic synchronization when this iPhone is connected, uncheck the box.
- Tick and highlight the MacOS with an iPhone “open” and the “auto sync when this iPhone is connected” box.
Don’t forget to manually backup your data frequently!
Wrapping Up
You could also back up your iPhone to other cloud storage providers as an alternative. You may, however, be required to pay a fee for a plan. Often, this would be in the form of a monthly subscription. Additionally, you will not be able to accomplish this straight from your iPhone or Mac. You will still need to follow the procedures outlined above to back up your iPhone to an external hard drive, though. Uploading files and photographs to a cloud service of your choosing is as simple as connecting your hard drive to a computer.


