Many Android users look into how to fix the Android boot loop issue without a factory reset. Why? Because the Android boot loop is a common problem on Android devices, your device fails to start properly and becomes trapped in the reboot cycle. As a result, when your phone does not start, it stays in the boot process, known as the “boot loop.” Having an Android phone stuck in a reboot cycle is a frustrating scenario since it might result in data loss, which we all fear.
But don’t worry! We have several methods that will allow you to resolve the boot loop issue on your Android device without losing any data. First, we’ll go through the leading causes of the boot loop problem on Android. And then, we’ll look at all of the possible fixes for it.
- What exactly is the Android boot loop problem?
- Method 1: Perform a Soft Reset on the Android Device
- Method 2: Make Use of the Custom Recovery Mode
- Method 3: Wipe the cache partition
- Method 4: Take out the SD card from the phone
- Method 5: Remove the Protective Case
- Method 6: Boot Your Android Device into Safe Mode
- Wrapping up
What exactly is the Android boot loop problem?
While Android boot loop problems may seem strange and illogical, there are a few distinct causes for their occurrence. The first thing to know is that it’s not true that boot loop errors happen only on rooted devices. Stock Android devices with the original software, ROM, and firmware are equally susceptible to problems. To blame for a boot loop is anything that has been done to the rooted device, such as flashing a new ROM or custom firmware that is not in line with its hardware or already installed software.
You might have an Android boot loop problem if your phone or tablet software can’t get in touch with system files when it’s trying to start up. If you have recently updated the Android operating system, you may have this problem. Another potential root cause of Android boot loops is corrupted or missing updates. Apps obtained from untrusted sites are infected with a specific form of a virus that prohibits you from using your device as intended.
All things considered, the Android boot loop problem is a direct result of attempting to make changes to your device’s internal settings. For this reason, if your device is stuck in a boot loop, you will need to either reset it or use a recovery procedure to get it working again.
Methods for resolving the boot loop problem on Android without erasing any data
Method 1: Perform a Soft Reset on the Android Device
Doing a soft reset is perhaps all that is needed to get your Android device out of its boot loop. The issue will be fixed if you turn off your device.
Follow these steps to complete the process:
- First and foremost, turn off your device and remove the battery from inside it.
- If your battery cannot be removed, you may simply turn off your Android device for 3-5 minutes. Then restart it to check if you can get into the operating system as you would expect to do so.
If you are experiencing problems with the boot loop, this approach will help you. It might not work for you to soft reset your Android phone to get it out of the boot loop. Then you should try the next method.
Method 2: Make Use of the Custom Recovery Mode
If you find that your Android device is stuck on the starting screen owing to a boot loop problem, you must attempt to restart the device in Custom Recovery mode. To do so, follow these steps:
- Press the Power and Volume Down buttons together to go into the Custom Recovery mode.
- In the Custom Recovery menu, choose the “Advanced” option.
- Select “Wipe Dalvik Cache” from the drop-down menu. When requested for confirmation, choose “Yes” as the choice.
- Afterward, you should go to “Mounts and Storage,” then choose “format/cache.” All cache files will be removed entirely from the system using this method.
- Restart your device.
Method 3: Wipe the cache partition
You can follow two methods in this case:
1: Using the Settings app to clear the Android Cache Partition
To improve the efficiency of your Android device and applications, use this straightforward approach to remove cached data. To remove the cache data on your Android device, follow the instructions below.
- Select Storage from the settings menu.
- Under the Storage menu, you can see how apps have already used space on your Android.
- Select the cache data by tapping on it.
- To finalize the operation of wiping the Android Cache partition, choose OK.
2. Using Recovery mode, wipe the Android Cache Partition
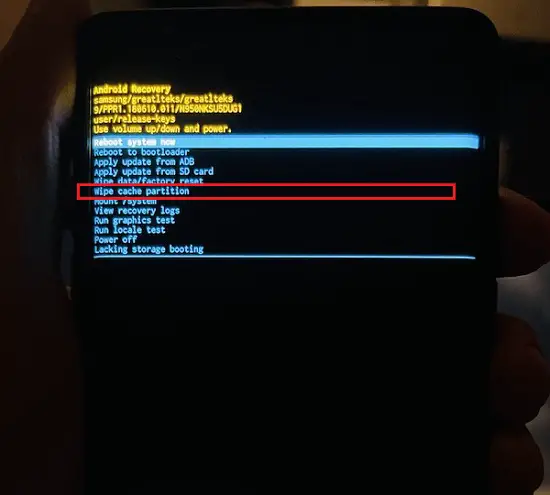
It is necessary to boot your Android device into recovery mode to complete this approach successfully. “Wiping cache partition” is the term used to describe this procedure. Follow the procedures outlined below to clean the Android cache partition using the recovery tool.
- Turn your Android device off.
- Keep pressing and holding the volume up key and the Power key simultaneously until the Android logo appears on your screen.
- Wait for the recovery screen to appear once you have released the power button.
- Make use of the volume keys to navigate to the “Wipe Cache Partition option.”
- Select “Clear Cache Partition” by pressing the power key.
- Restart the Android device.

Android’s cache partition, which stores temporary data, will be cleaned up. The Android system is ready to store new data in the cache.
Method 4: Take out the SD card from the phone
When using an SD card with an Android phone, any problematic files on the card might be the source of the problem. You can remove your card from your phone and switch it on to see whether your card is actually the source of the problem.
It’s as simple as pulling the SD card out of your device and turning it on. So, if it boots up without any problems, your SD card may be the problem, and you should consider replacing it.
Method 5: Remove the Protective Case
Protecting the rear cover of your Android with a protective case helps keep the phone’s finish scratch-free and clean. However, it also inhibits the phone from swiftly cooling down the overheated device, resulting in the Android getting stuck in the startup animation. Because of this, you may remove the case from your Android smartphone and restart it afterward.
Method 6: Boot Your Android Device into Safe Mode
The boot loop on Android may be eliminated in certain situations by booting the device into safe mode during the first boot. Rebooting the device will do this. The device will prompt you to enter Safe Mode when the logo appears on the screen and you press and hold the Volume Down button for a few seconds. Hit the OK button to confirm your decision afterward.
Wrapping up
The Android boot loop problem is a reasonably prevalent problem that may occur at any time and place. Please follow the instructions in this article if you need to restore your Android data in the event of this problem. After that, you should be able to resolve the issue and restore your phone to its previous condition. There are also apps available that promise to be able to resolve these difficulties, but you will have to pay to get them.


