Improve your productivity by learning how to split the screen on your Mac with these tips and tricks. Now and then, you simply have to do more than one thing. One window isn’t always enough, whether you’re working on a report at work, surfing the web with a chat window open, or simply watching videos as you “write” your masterpiece. Full-screen windows are annoying and time-consuming to switch between.
In the case of a Mac, you may use the split-screen option to show two applications (or two independent browser windows) on each side of your display. So you don’t have to move your mouse or use Command + Tab to switch between windows.
- Requirements for Split Screen View on your Mac
- How to Split Screen on a Mac: Methods
- What is the best way to customize your split-screen view?
- What is the best way to exit split-screen mode on a Mac?
- Is it possible to access the split view on a Mac running an earlier version of macOS?
- Why isn’t my Mac allowing me to use split-screen mode?
- Final Words
Requirements for Split Screen View on your Mac
With the introduction of OS X El Capitan in 2014, the split-screen mode was made available for the first time. You couldn’t see two applications at the same time in older versions of the Mac operating system, which is kind of unfortunate.
Some applications do not support split screens, particularly third-party apps obtained from the Internet. Suppose an app refuses to take up half of the screen, even though all of the appropriate settings seem to be in place. In that case, it’s safe to assume that the app is most certainly not intended to be used in this manner. It is important to note that most of Apple’s default applications on the MacBook are compatible with this feature.
How to Split Screen on a Mac: Methods
1. The fast and easy method
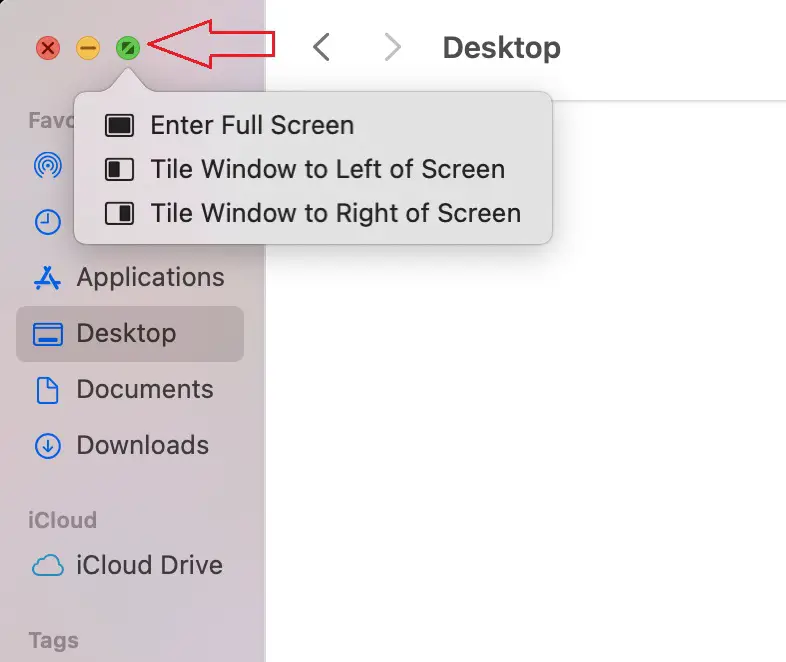
Step 1: To begin with, open two or more windows that you wish to be paired together in a split-screen layout. There can be anything from browser windows, applications, documents, or whatever else you want. Look in the upper-left corner of your first window for three colored dots: red, yellow, and green. This is your starting point. These are in charge of controlling the window.
Step 2: If you move your mouse cursor over the green dot, you will see two little “expand” arrows appear. When you press and hold this green dot, a selection of options appears: Full Screen, Tile Window to the Left of the Screen, and Tile Window to the Right of the Screen are all available options. If you choose the second or third option, the window will occupy that portion of your screen.

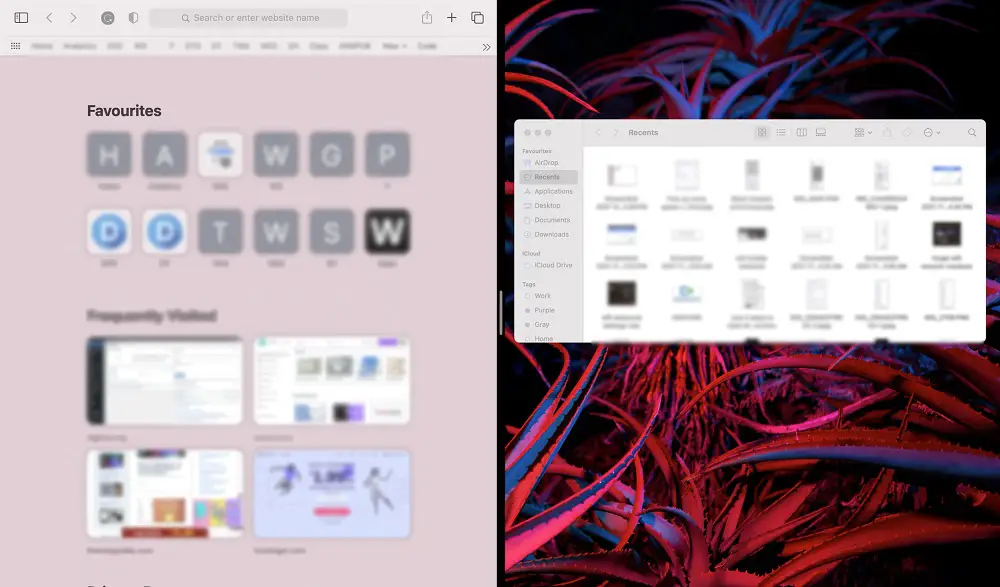
Step 3: You have completed one side of your Split View. A thumbnail of any other open windows will appear on one side of the screen, and the primary app will take up one-half of the screen. In Split View mode, choose the other window you wish to use to fill in the void. This will bring the Split View experience to successful completion. To switch your primary focus between the two windows, just touch on any of them.

2. How to Enable Split View on Your Mac Using Mission Control?
Using Mission Control on a Mac to bring up Split View is also a very pleasant experience. However, it entails more steps than the approach outlined before. So let’s have a look at how it works in practice:
Step 1: Launch any app window in full-screen mode on your Mac device.
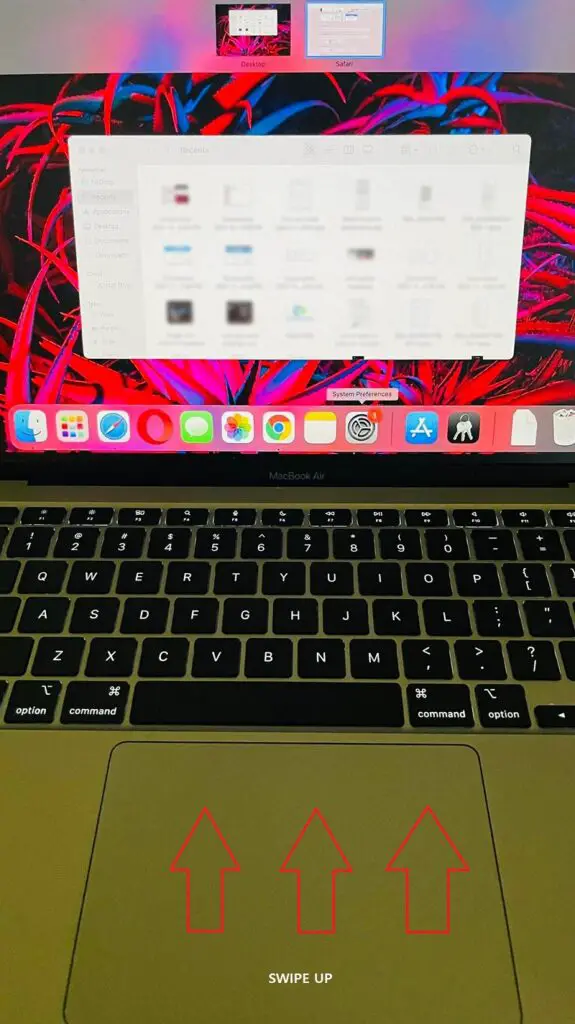
Step 2: Now, on your Mac, activate Mission Control by swiping up with three or four fingers. You may also launch Mission Control on your Mac by double-tapping with two fingers on the Magic Mouse or pressing the Control and Up arrows at the same time.

Step 3: Drag an app window over the app thumbnail in full-screen mode.
Step 4: And there you have it! On your Mac, both applications will automatically switch to Split View mode. You may start using the two apps side by side by selecting the Split View thumbnail and clicking it.
3. Use the trackpad to switch between windows and applications
Want an even more convenient method to handle your windows, do split-screen operations on your Apple computer, go into full-screen mode, or minimize windows that aren’t now required? A trackpad gesture may be used to extend the functionality of a split-screen extension on your Mac, which is an improvement over the previous option.
To manage the windows on your desktop using basic trackpad motions, Swish is an app that you may download. If you want to snap two windows together, all you have to do is swipe one to the right and the other to the left. Using a swipe down or a swipe up, you may shift from full screen to minimize. The app’s settings provide a thorough description of these and many more intuitive gestures.
To restore your windows to their normal size, just move them slightly out of their original position, and the windows will snap immediately back into their original position.
4. Use Split View on the Mac to access other applications
Multitasking and Mission Control go hand in hand. You may use Mission Control to launch other applications on a split-screen on a Mac. This is how you may go about it:
Step 1: Activate Mission Control as the first step in this procedure. With three or four fingers on the trackpad or two fingers on the Magic Mouse, just swipe up.
Step 2: It’s now only a matter of switching between Split View and other windows by selecting the thumbnail of the app you wish to use. The Dock or the Launchpad may be used to access an application if there isn’t one currently open in the background.
You may also utilize a multi-touch gesture like swiping with four fingers on your trackpad to switch between open apps.
What is the best way to customize your split-screen view?
Would you want to swap sides? Moving a window from one side of the screen to the other in a split view is possible by clicking anywhere on the gray menu bar of that window and dragging it to the other side. When using the split-view mode, keep in mind that, by default, the menu bars are not visible. However, if you move your pointer to the top of the screen, the menu bars will return to the screen.
What is the best way to exit split-screen mode on a Mac?
It’s simple to dismiss split-screen mode after you’ve got your fill. Using either window, move your mouse cursor to the top of the screen until the grey menu bar is visible again. When you click on the green circle button, you will immediately be taken out of split-screen mode. Otherwise, hover over “Exit Full Screen” and click the “Exit Full Screen” button.
Is it possible to access the split view on a Mac running an earlier version of macOS?
The procedure for enabling Split View in macOS Mojave, macOS High Sierra, macOS Sierra, and OS X El Capitan is almost identical to enabling Split View in other versions of the operating system. But there are slight differences, so let’s have a look at how it’s accomplished:
Step 1: To begin, launch the two apps that you wish to access side by side on your macOS device and click “Open.”
Step 2: Select Full Screen by clicking and holding the green “full-screen” button located in the upper left corner of the window. Keeping the full-screen button held causes the window to shrink, enabling you to move it to the right or left side of your Mac screen.
Step 3: Release the button now. Next, choose an application window on the flip side of the screen to begin utilizing both windows jointly. That’s all there is to it. You may now successfully use the productivity-enhancing capabilities of split-screen mode.
Why isn’t my Mac allowing me to use split-screen mode?
Make sure you aren’t currently in fullscreen mode before you proceed. When using the standard windowed view, a split-screen is not available. As a last resort, go to System Preferences > Mission Control to confirm whether Displays with Separate Spaces are enabled on any displays. If it isn’t already, turn it on.
As a precaution, make sure you have macOS 10.11 or later installed on your Mac before trying to access that option. You can find out what operating system version you are currently running by choosing “About This Mac” from the Apple symbol in the upper left menu. If you’re using an older version, you’ll need to upgrade it by selecting the Software Update option from the main menu on the right.
Take note that not all applications are capable of running in split-screen mode. You may not be able to tile in split-screen mode if you’ve done everything else, and the app still won’t tile in split-screen mode.
Final Words
With each step forward in your professional or educational journey, you’re likely to discover that you’ll need to increase your productivity and do more activities at the same time. The number of active windows and applications on your Mac continues to expand at an exponential rate, but the amount of empty space on your screen seems to be shrinking.
Unfortunately, the split-screen mode’s options and possibilities are severely limited. Split View will likely disappoint you if two applications on the same screen are not sufficient for maximum productivity. You’ll probably spend a significant amount of time attempting to find the perfect app for your requirements. And it is at this point. You will need a specialist application for the function. For example, in addition to Swish, a few more applications are available, such as Magnet or Split Screen, which have better split-screen functionality to offer.
Also Read: How to Keep Your MacBook Battery Healthy [8 Expert Tips]


